
First Time Canning In The Panhandle
Posted on September 1, 2023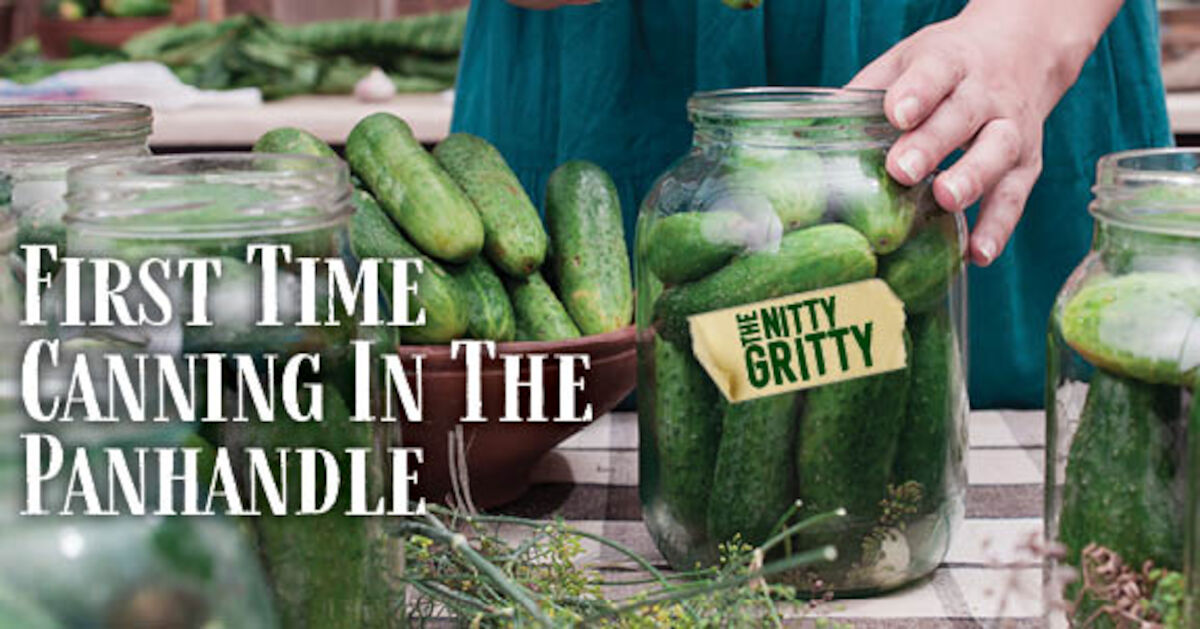
This year was a very productive year for me. I got a garden planted a week after the last frost happened in March,and it did fairly well in several areas for me. So much so that I decided to preserve some of it for the first time ever. I went through my storage options and decided the best bet was canning as I had a root cellar with shelves already installed and a mess of jars my wife had hunted at garage sales for.
I had an abundance of cucumbers so my wife and I decided that pickles was the way to go to get started. We gathered the necessary ingredients and jars and jumped into the slow paced world of brining. Brining is the process of soaking your meat or vegetables in a salt water bath to begin the preservation process. This can take 12 hours minimum or up to a week. In vegetables it helps to keep them crisp. For best results pick, brine and can within 24 hours for crispest pickles. The cheapest route to go for spices in bulk is the internet and gebos.com and most can ship within 72 hours to your house. Using a water bath canner and an outdoor propane burner (purchased at Gebos) we proceeded to can 48 jars of pickle chunks, slices, and spears and even 3 jars of pickled okra. My first bit of advice in this area is to start early in the day as each batch takes about 2.5 hours start to finish. Id also recommend anybody new to canning start with water bathing as its essentially just a big pot of boiling water. As long as it took to do, the recipes were very simple and easy to follow. There are so may out there that its best to just pick a recipe you think you will like and go for it. The worst part of pickling is waiting 3 weeks or longer for them to pickle. Other than that its an excellent place for a beginner to start.
The next thing I had to learn to use was a pressure canner and let me say the nerves were high on this one. Its really not that complicated but something about building pressure in a potential bomb situation made me nervous. I had nightmares of circular holes in my roof for days. Turns out the hardest part I had in the next step, was finding my next recipe. See, my garden had begun producing zuchinni and yellow squash like crazy and I didnt want it to go to waste.To make matters worse there wasnt a single canning recipe to be found anywhere! In fact most websites will tell you its not safe due to certain records being lost, but funny enough you can buy canned squash in just about any grocery store. Why is it safe for big business but not individual homes? Time to do some research. Turns out way back in 1971 the FDA had a major screwup in their records department which lead to all the data for canning those vegetables being lost. It wasnt treated as that big a deal as Ball and Kerr (two major canning suppliers and educators) still had the original recipes in their cookbooks and the processes to can them. Fast forward 20 years to 1991 and the FDA passes down the decision that if they dont have it as confirmed as a safe process in their records then the recipes can no longer be reprinted in new cookbooks. Hence the great squash canning cover up began and the recipe began to gradually be lost to the sands of time.
So here we are another 31 years on to 2022 and I am looking in vain for a recipe and process to save my bumper zuchinni and squash harvest. When my wife sees an ad for jars on sale at the local Gebo's and asks me to go get a few more dozen to add to the collection. While i was there i had the good fortune to mention at the register i was looking for canning recipes particularly squash and zuchinni. This genuine young man smiled and told me his 90 yr old grandmother still canned and she had the ORIGINAL BALL CANNING BOOK! All the processes and recipes i needed and supposedly lost to time saved! He got my cell number and later that evening I received a picture of the very thing I needed! This was above and beyond as he sent it after he got off work and everything. It was a mere picture and a warm thanks after, but that saved my harvest this year for sure! Another 39 quarts saved later and my shelves were looking full! The pressure canner still made me nervous but again the hardest part was waiting for each to process which was easily a good 3 hour turnaround on each batch.
Gebo's is normally a good ranch store for me. I can pick up feed, vaccines for my dogs, and even some toys without batteries for the kids, but to be able to recover knowledge lost even to the internet makes them number 1 in my book. If I ever need more info on something its nice to know Gebos can be as reliable as Google. My wife and I enjoyed learning to can squash together and I definitely am enjoying the pickles already. I will share our recipes we used this year as well, just in case anyone else is interested. The basic steps and suppiles are listed in the Ball Canning book, recipes listed will be only for the ones I or my wife had to make or discover ourselves as the Ball book has most already covered. This process can be confusing but at the same time so rewarding and healthy, I hope some of y'all will give it a try! Recipes are below.
Canned Zuchinni/Squash 1971 recipe and process
Step 1: Cut squash lengthwise, clean all the seeds out of the middle with a spoon. This is similar to cleaning a pumpkin. Save the seeds for drying and planting.
Step 2: Cut squash into 1 inch cubes. If skin is especially thick on yellow squash use a peeler to remove the thickest part but not all the yellow to the flesh. The skin is what keeps it from turning to mush
Step 3: Follow all steps for jar preparation and sterilization and add 1 tsp of salt to a quart jar and fill up jars with squash leaving 1 inch of headspace. Shake each jar to help settle and fill to the max.
Step 4: Fill jars with boiling water to cover and leave the 1 inch headspace. Clean rims and place lids and bands.
Step 5: Place in canner and bring to 12 psi (for Amarillo Texas. Use whatever PSI is best for your elevation) for 45 minutes.
Step 6: Remove from canner and let sit at room temperature for 12 hours before cleaning and labeling.
Canned Chicken Legs and Thighs
Step 1: Clean all skin and fat off of chicken legs and thighs. If using quarters seperate them at the joint.
Step 2: Follow all jar preparation and sterilization guidelines and then add 1 tsp of chicken bouillon to each jar. Add chicken to jar leaving 1 inch headspace. This will be about 2 thighs or legs per pint jar.
Step 3: Add boiling water to jars leaving 1 inch headspace and clean all rims very well. Band and lid as recommended.
Step 4: Pressure can for 90 minutes at 12 psi ( or whatever recommended psi for your elevation)
Step 5: Remove jars from canner and let sit for 12 hours at room temperature before cleaning and labeling.
By: Brett Varner
Choose Another Article